GitHub Account Setup
This guide walks you through the complete setup process: configuring Git on your computer, generating SSH keys, creating your GitHub account, and cloning your first project. You'll complete these steps during our first class session.
Already have a GitHub account? If you're setting up a different computer (like your personal laptop), you'll need to complete Steps 1-2 (Git config and SSH keys), then jump to Step 4: Add Your SSH Key to GitHub and Authenticate.
Step 1: Configure Git Identity
Before you can commit code, Git needs to know who you are. This information will be attached to all the changes you make.
1.1: Open Terminal or Command Prompt
On Mac (lab computers or personal laptops):
- Press Command + Space to open Spotlight
- Type "Terminal" and press Enter
On Windows (personal laptops):
- Press the Windows key
- Search for "Command Prompt" or "Git Bash"
- Click to open (either will work)
1.2: Set Your Name
Type the following command, replacing "Your Name" with your actual name:
git config --global user.name "Your Name"
Press Enter. Nothing will appear to happen—that's normal!
1.3: Set Your Email
Type the following command, replacing the email with your Watkinson school email (your @watkinson.org address):
git config --global user.email "your.email@watkinson.org"
Press Enter.
Why your school email? This should match the email you'll use for your GitHub account in the next steps.
1.4: Verify Your Configuration
To check that everything was set correctly, type:
git config --global --list
You should see your name and email listed. If you made a mistake, just run the commands again with the correct information—the new values will replace the old ones.
Your Git identity is now configured!
Step 2: Generate SSH Keys
SSH keys allow your computer to communicate securely with GitHub without entering a password every time. You'll generate a key pair on your computer, then add the public key to your GitHub account.
Choose your platform: Follow the instructions for your operating system below.
For Mac (Lab Computers)
2.1: Open Terminal
If Terminal isn't still open from Step 1, open it again (Command + Space, then type "Terminal").
2.2: Generate an SSH Key
Type the following command, replacing your.email@watkinson.org with your actual Watkinson email address:
ssh-keygen -t ed25519 -C "your.email@watkinson.org"
Press Enter.
2.3: Save the Key
When asked "Enter a file in which to save the key," just press Enter to accept the default location.
2.4: Set a Passphrase (Optional)
When asked for a passphrase:
- Press Enter twice to have no passphrase
Your SSH key has been created!
2.5: Start the SSH Agent
Type this command:
eval "$(ssh-agent -s)"
Press Enter. You should see something like Agent pid 1234.
2.6: Add Your SSH Key to the Agent
Type this command:
ssh-add ~/.ssh/id_ed25519
Press Enter.
2.7: Copy Your Public Key
Option A: Using pbcopy (easier)
Type this command:
pbcopy < ~/.ssh/id_ed25519.pub
Press Enter. Nothing will appear to happen, but your public key is now copied to your clipboard!
Option B: Manual copy
Type this command:
cat ~/.ssh/id_ed25519.pub
Press Enter. You'll see your public key displayed (it starts with ssh-ed25519 and ends with your email). Carefully select and copy all of this text.
Keep this Terminal window open—you'll need it for Step 4 to add your key to GitHub and test your connection.
For Windows (Personal Laptops)
2.1: Open Git Bash
- Press the Windows key
- Search for "Git Bash"
- Click to open Git Bash
Don't have Git Bash? You need to install Git first. See the Windows Installation Guide to install Git, then come back here.
2.2: Generate an SSH Key
Type the following command, replacing your.email@watkinson.org with your actual Watkinson email address:
ssh-keygen -t ed25519 -C "your.email@watkinson.org"
Press Enter.
2.3: Save the Key
When asked "Enter a file in which to save the key," just press Enter to accept the default location.
2.4: Set a Passphrase (Optional)
When asked for a passphrase, press Enter twice to have no passphrase (this is simpler for getting started).
Your SSH key has been created!
2.5: Start the SSH Agent
Type this command:
eval "$(ssh-agent -s)"
Press Enter. You should see something like Agent pid 1234.
2.6: Add Your SSH Key to the Agent
Type this command:
ssh-add ~/.ssh/id_ed25519
Press Enter.
2.7: Copy Your Public Key
Type this command:
cat ~/.ssh/id_ed25519.pub
Press Enter. You'll see your public key displayed (it starts with ssh-ed25519 and ends with your email).
Carefully select and copy all of this text:
- Right-click in Git Bash and select Copy, OR
- Use Ctrl + Insert to copy
Keep this Git Bash window open—you'll need it for Step 4 to add your key to GitHub and test your connection.
Step 3: Create Your GitHub Account
We'll create your GitHub account using your Watkinson Google account so everything stays connected.
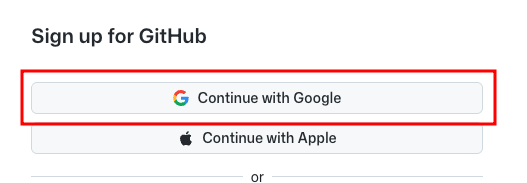
3.1: Go to GitHub Signup
Go to github.com/signup and click the Continue with Google button.
3.2: Choose Your Watkinson Account
When prompted to choose an account, select your Watkinson school account (your @watkinson.org email).
3.3: Allow Access
Click Continue to allow GitHub access to your Google account.
3.4: Pick a Username
Choose a username for your GitHub account. This will be visible publicly, so pick something appropriate and professional. Your username will appear in your profile URL and repository addresses.
Click Create Account when you're ready.
Tip: Your GitHub username becomes part of your professional identity as a developer. Many people use their real name, a variation of it, or a consistent handle they use elsewhere online.
Congratulations — you now have a GitHub account!
Step 4: Add Your SSH Key to GitHub and Authenticate
Now you'll add your SSH key to your GitHub account so your computer can communicate securely with GitHub, then test the connection.
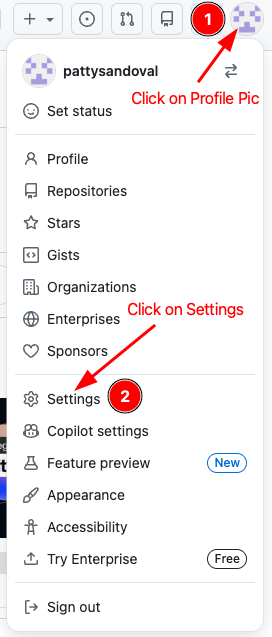
4.1: Open GitHub Settings
Click your profile picture in the upper-right corner of GitHub, then choose Settings from the menu.
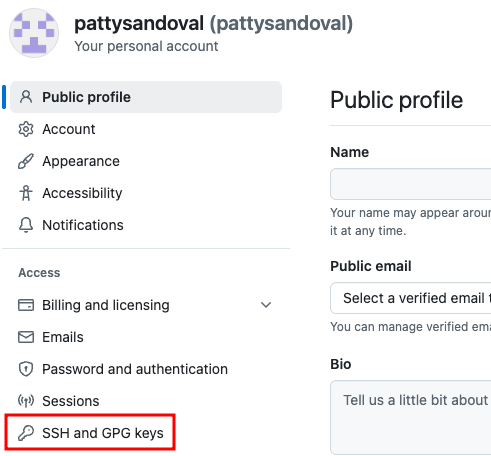
4.2: Navigate to SSH Keys
In the left sidebar, click SSH and GPG keys.
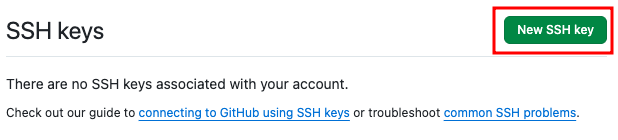
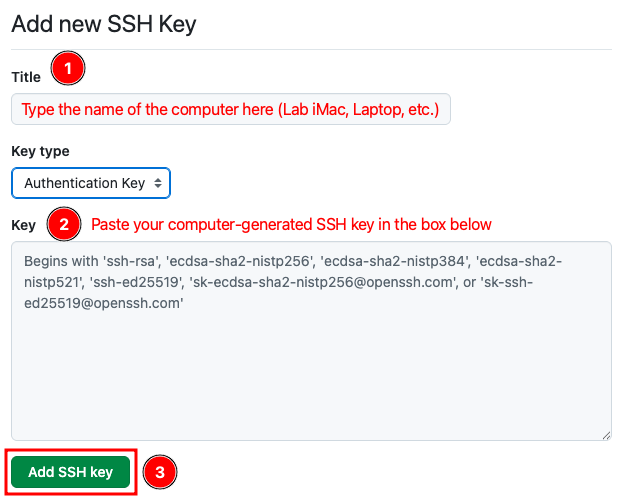
4.3: Add a New SSH Key
Click the green New SSH key button.
4.4: Enter Your Key Details
-
Title: Enter a name that identifies which device this key is from. For the lab computers, use something like "Lab iMac" or "Watkinson Lab". For your personal computer, use something like "My MacBook" or "Home Laptop".
-
Key: Paste your public SSH key here. You copied this during the installation process — if you need to copy it again, see the installation guide for your system.
-
Click Add SSH key to save.
4.5: Test Your SSH Connection
Now that you've added your SSH key to GitHub, let's verify that your computer can successfully connect.
In your Terminal or Git Bash window (where you generated your SSH key earlier), type this command:
ssh -T git@github.com
Press Enter.
What to Expect:
-
First-time connection warning: If this is your first time connecting, you may see a message saying the "authenticity of host 'github.com' can't be established."
- Action: Type
yesand press Enter to continue. This adds GitHub's fingerprint to your list of known hosts — you'll only see this warning once per computer.
- Action: Type
-
Success message: If everything is set up correctly, you will receive a response like this:
Hi [Your Username]! You've successfully authenticated, but GitHub does not provide shell access.
This message means your SSH key is working correctly! The "does not provide shell access" part is normal — GitHub only allows you to interact with repositories, not run commands on their servers.
-
Authentication failure: If you see a "Permission denied (publickey)" error, it means your computer isn't sending the correct key or the key hasn't been properly added to your GitHub account.
- What to do: Go back and check that you completed steps 4.1-4.4 correctly. Make sure you copied the entire public key (starting with
ssh-ed25519and ending with your email).
- What to do: Go back and check that you completed steps 4.1-4.4 correctly. Make sure you copied the entire public key (starting with
Your SSH authentication is now complete!
Important: Each device needs its own SSH key. If you want to work from both the school lab and your personal computer, you'll add two separate keys (with different titles so you can tell them apart).
Step 5: Submit Your Profile URL
Now you'll share your GitHub profile with your teacher so they can track your repositories throughout the course.
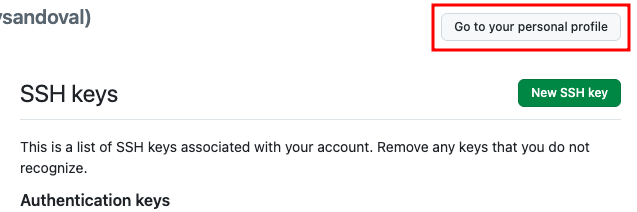
5.1: Go to Your Profile
While still in Settings, click the Go to your personal profile button in the top-right area of the page.
5.2: Copy and Submit Your Profile URL
- Look at the address bar in your browser — it will show something like
https://github.com/yourusername - Copy this URL
- Go to the assignment in Google Classroom and paste the URL to submit it
Step 6: Create Your Repository from the Template
Now you'll create your own copy of the personal landing page template. This will be your first repository.
6.1: Open the Template
Open the template link from your Google Classroom assignment: Personal Landing Page Template
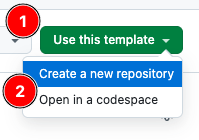
6.2: Use the Template
Click the green Use this template button and choose Create a new repository.
6.3: Configure Your New Repository
- Repository name: Use
personal-landing-page(or another clear name) - Description: Optional — you can leave this blank
- Visibility: Keep it set to Public
- Click Create repository
Why public? Your repositories need to be public so your teacher can see your work and so you can publish your sites using GitHub Pages.
Your new repository is now created in your GitHub account!
Step 7: Clone Your Repository in Phoenix Code
The final step is to download your repository to your computer so you can start coding. This process is called "cloning."
7.1: Set Up Your Project Folder
Before cloning, create a folder on your computer where you'll keep all your web development projects:
- On Mac: Open Finder and go to Documents. You should see a Phoenix Code folder that was created during installation — this is a good place for your projects.
- Inside your projects folder, create a new subfolder called
personal-landing-page(or match your repository name)
Organization tip: Create a separate subfolder for each repository you clone. This keeps your projects organized and prevents confusion.
7.2: Copy the SSH Clone URL
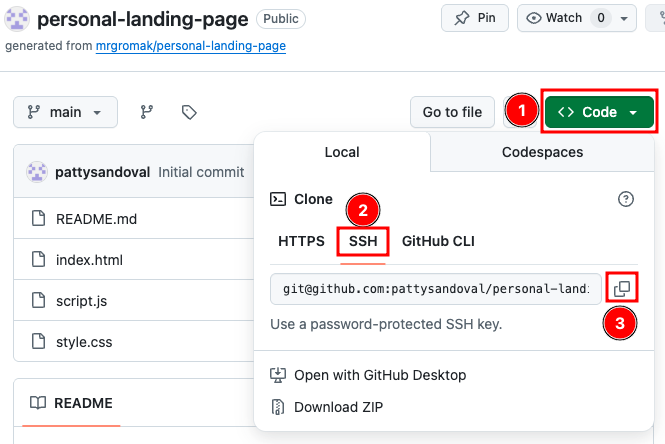
Back on your repository page in GitHub:
- Click the green Code button
- Select the SSH tab
- Click the copy button to copy the SSH URL (it looks like
git@github.com:yourusername/personal-landing-page.git)
7.3: Launch Phoenix Code
Open Phoenix Code. When the Start Project dialog appears, click Get from Git.
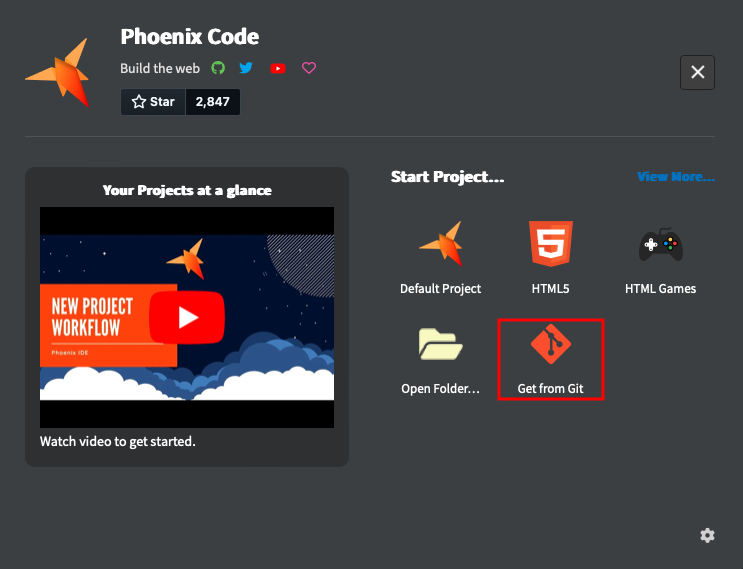
Dialog not showing? You can also access this from the menu: File > Git > Clone
7.4: Clone Your Repository
- Paste the SSH URL you copied into the repository URL field
- Browse to select the subfolder you created in step 7.1
- Click Create Project
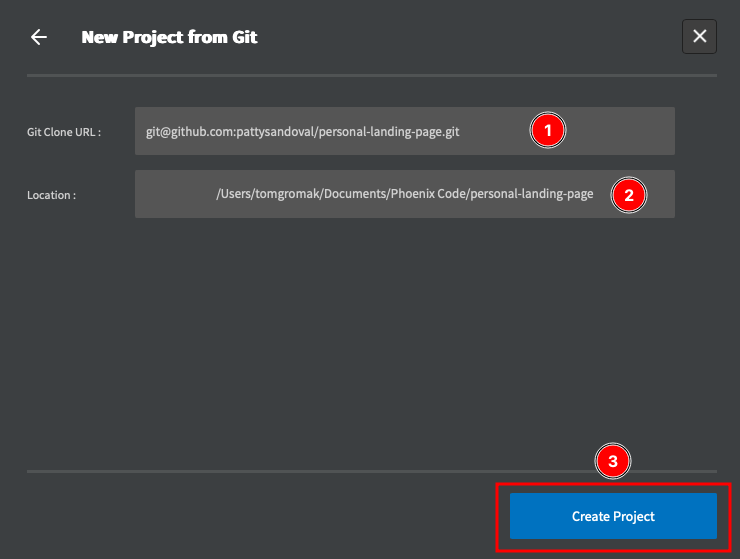
Phoenix Code will download your repository and open it as a project.
You're Ready to Code!
Your development environment is now fully set up:
- Your GitHub account is connected to your school Google account
- Your computer can communicate securely with GitHub via SSH
- Your first repository is cloned and ready to edit
From here, you'll use the workflow described in the Git, GitHub & Phoenix Code guide to edit files, commit changes, and push your work to GitHub.
Next step: Start exploring the template files and make your first edit!